http://www.oracle.com/technetwork/java/javase/downloads/jdk-7u3-download-1501626.html
2. Download Eclipse ( I prefer classic version)
http://www.eclipse.org/downloads/
3. Download Android SDK (choose .zip file)
http://developer.android.com/sdk/index.html
4. Run Eclipse and choose path for the workspace
5. Close the "welcome" window
6. To link with Android, click Help>> Install New Software..
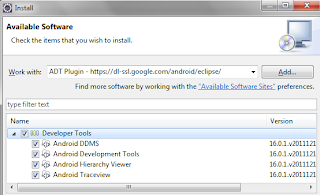
7. Click “Add” and for the name, type “ADT Plugin”, for the Location, type https://dl-ssl.google.com/android/eclipse/ then click “Ok”.
8. Choose work with : ADT Plugin that we already add before, and install the Developer Tools. Proceed the installation.
9. Unzip Android SDK
10. Go back to eclipse, Window>>Preferences>>choose the android sdk folder that had been unzipped before
11. After Android platform had been installed, the Android icon will be appeared at the top
12. Click Android SDK Manager button
13. Choose the Android version you want to install. (It will take more than an hour to install all versions)
14. After the installation, Click AVD Manager button
15. Click New, put your virtual device name, target. Click create AVD.
16. Choose the virtual device that you’ve created and click start>>Launch.
17. Wait for the emulator to launch (depends on your processor, it will take a few minutes)
18. Simple App - HelloWorld Android
Do not close the emulator, File>> New >> Android Project(If Android Project does not appear, click Project..>>Android>>Android Project)
19. Put Project Name, for the build target, it depends on your emulator. Mine is Android 2.2
20. Put the Package Name. (ex : com.hello.android, every project should have different package name) and click finish. The project will be in the package explorer.
21. Adding element on xml . Go to main.xml under res>>layout>>main.xml
22. Add button on the layout (drag the button and place it in the layout or you can put xml code to add button)
23. Give an id for TextView ( you can put your own suitable id, mine is “textview1”, also erase the android:text=“”)
24. Click to the .java code
25. Add click listener to perform activity when the button is clicked
26. Run the code(Click run button), run as Android Application
27. The result as shown, after you click the button, the words will come out.
28. Run on device. Make sure your Android device have been installed its driver on your computer. Connect your device to your computer. (Make sure your device in usb debugging mode: on your android device, go to settings>>Application>>Development>>tick to USB debugging)
29. Go to android sdk folder>>tools>>ddms. If it detect your device, you will see your device on the ddms.
30. Close the emulator. Run the code once again.
That's all... Easy rite?..


as slm..mf ggu prof.ammar.sye nk tnye soalan,maksud KURUP tu ape ek??huhu..adakah sejenis android's application..?sye ngah conpius2.........
ReplyDeleteammar,ce tgok nokiaman87.blogspot.com...ce teke sape??
ReplyDeletehaha.. sam kot
ReplyDelete