Thursday 14 June 2012

XNA 2D game tutorial - controllable sprite

1. Initialize keyboard state (continue from XNA 2D game tutorial-animated sprite)

public class Game1 : Microsoft.Xna.Framework.Game
    {
        GraphicsDeviceManager graphics;
        SpriteBatch spriteBatch;
        Texture2D character;
        Vector2 position = new Vector2(200, 200);
        Point frameSize = new Point(28, 41);
        Point currentFrame = new Point(1, 0);
        Point sheetSize = new Point(12, 8);
        int state = 2; // walk if keyboard pressed
        float speed = 5; 
        KeyboardState currentState;
        KeyboardState theKeyboardState;
        KeyboardState oldKeyboardState;
        TimeSpan nextFrameInterval = TimeSpan.FromSeconds((float)1 / 16);

------------------------------------------------------------------------------------------------------------------
protected override void Update(GameTime gameTime)
        {
            // Allows the game to exit
            if (GamePad.GetState(PlayerIndex.One).Buttons.Back == ButtonState.Pressed)
                this.Exit();
            currentState = Keyboard.GetState();
            theKeyboardState = Keyboard.GetState();
            if (state == 1) // means walking state
            {
                currentFrame.Y = 2;
                currentFrame.X++;
                if (currentFrame.X >= 12)
                    currentFrame.X = 0;
            }
            oldKeyboardState = theKeyboardState;
            base.Update(gameTime);
        }

2. Move and animate
    if (state == 1) // means walking state
            {
                currentFrame.Y = 2;
                currentFrame.X++;
                if (currentFrame.X >= 12)
                    currentFrame.X = 0;
            }
else if (state == 2) // means wait for keyboard input
           {
                currentFrame.Y = 0;
                currentFrame.X ++;
                if (currentFrame.X >= 12)
                    currentFrame.X = 0;
                if (currentFrame.Y >= 1)
                {
                    currentFrame.Y = 1;
                    position.Y = 200;
                    frameSize = new Point(28, 41);
                }
                if (currentState.IsKeyDown(Keys.Right))
                {
                    frameSize = new Point(28, 41);
                    position.Y = 200;
                    currentFrame.Y = 2;
                    currentFrame.X++;
                    if (currentFrame.X >= 12)
                        currentFrame.X = 0;
                    position.X += speed;
                }
                else if (currentState.IsKeyDown(Keys.Left))
                {
                    frameSize = new Point(28, 41);
                    position.Y = 200;
                    currentFrame.Y = 1;
                    currentFrame.X++;
                    if (currentFrame.X >= 12)
                      currentFrame.X = 0;
                    position.X -= speed;
                }
            }
3. Run the code
4. If we press right,
5. If we press left,
6. Create .exe file
Build>> Publish <project name>.žChoose the location. Finish
7. VS 2010 will create your application’s installer
8. You can install your application in other computer ( just click the setup.exe file)
9. Click Start>> All programs. You will find your application has been installed in your computer.

10. You can refer the publication process from this link http://msdn.microsoft.com/en-us/library/bb464156.aspx


XNA 2D game tutorial - animated sprite

1. Initialize state and time (continue from the XNA 2D games static sprite tutorial)
GraphicsDeviceManager graphics;
SpriteBatch spriteBatch;
Texture2D character;
Vector2 position = new Vector2(200, 200);
Point frameSize = new Point(28, 41);
Point currentFrame = new Point(1, 0);
Point sheetSize = new Point(12, 8);
int state = 1; // 1 = walking state
TimeSpan nextFrameInterval = TimeSpan.FromSeconds((float)1 / 16);
public Game1()
{
            graphics = new GraphicsDeviceManager(this);
            Content.RootDirectory = "Content";
           TargetElapsedTime = new TimeSpan(0, 0, 0 , 0, 100);
            // means, frame will be updated every 100ms.
  }

2. Now we want our character to be automatically at the walking position and animating. Go to update method and add this :
protected override void Update(GameTime gameTime)
        {
            // Allows the game to exit
            if (GamePad.GetState(PlayerIndex.One).Buttons.Back == ButtonState.Pressed)
                this.Exit();           
            if (state == 1) // means walking state
           {
                currentFrame.Y = 2;
                currentFrame.X++;
                if (currentFrame.X >= 12)
                    currentFrame.X = 0;
            }
            base.Update(gameTime);
        }

3. Code explaination
currentFrame.Y = 2;
// for the walking state, we will use row number 2.
currentFrame.X++;
if (currentFrame.X >= 12)
 currentFrame.X = 0;
// in the row number 2, there are 12 characters and it will move one by one until the last character and it will loop back from the character number 0.

4. Run the code
    -Build (Shift+F6) and Run (Ctrl+ F5).žThe walking mario will appeared. 


XNA 2D game tutorial - static sprite

1. Create New Project on VS2010. Choose Windows Game
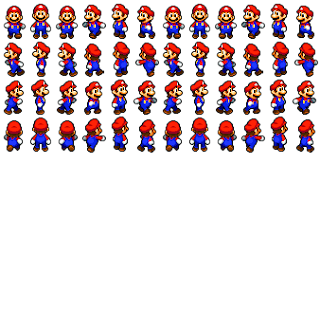
2. Download any sprites. This tutorial will use this sprite. Right click and save it.
3. Create a new project, and you will see the solution explorer as shown. 
4. Copy and paste the sprite in content folder. (usually in myDocument>> Visual Studio 2010>>Projects>>(project name) >> (project name) >> (project name)Content.
5. Edit the code (Game1.cs)
     -public class Game1 : Microsoft.Xna.Framework.Game
    {
        GraphicsDeviceManager graphics;
        SpriteBatch spriteBatch;
        Texture2D character;
        Vector2 position = new Vector2(200, 200);
        Point frameSize = new Point(28, 41);
        Point currentFrame = new Point(1, 0);
        Point sheetSize = new Point(12, 8);
        public Game1()

6. Code Explaination
    Texture2D character;
// Texture2D to keep the image of our character
Vector2 position = new Vector2(200, 200);
//hold the position of our character on the screen
Point frameSize = new Point(28, 41);
//each character size will be x= 336/12 =28
y= 324 / 8 = 40.5 = 41 (assuming white space also filled with mario character)
Point currentFrame = new Point(1, 0);
// hold which position we are. In case (1,0),
screen will show this image.
Point sheetSize = new Point(12, 8);
// hold how many frames are on the line and how many lines of frame we have.


7. Load image
    -Right click on the content folder>>Add existing item>> choose mario sprite.
8. Load image (code)
    protected override void LoadContent()
 {
// Create a new SpriteBatch, which can be used to draw textures.
spriteBatch = new SpriteBatch(GraphicsDevice);
character = Content.Load<Texture2D>("mario8d");
}
Note: put in the bracket (“”) the sprite image’s name. In this case, the sprite is mario8d.png

9. Draw the sprite
protected override void Draw(GameTime gameTime)
       {
            GraphicsDevice.Clear(Color.CornflowerBlue);
            spriteBatch.Begin();
            spriteBatch.Draw(character, position, new Rectangle(
                            frameSize.X * currentFrame.X,
                            frameSize.Y * currentFrame.Y,
                            frameSize.X,
                            frameSize.Y),
                            Color.White, 0, Vector2.Zero, 1,       SpriteEffects.None, 0);
            spriteBatch.End();
            base.Draw(gameTime);
        }


10. Run the code 
      -Build (Shift+F6) and Run (Ctrl+ F5).The static (1,0) mario will appeared.


Android - Accelerometer


1. File>>New>>Android Project
2. Choose Android 2.2 or later for build target
3. Click to the .java class and after the “extends Activity”, put “implements SensorEventListener”(The error will occur then point your cursor to the error and click “Add unimplemented methods”)
4. Go to layout>>main.xml, add textView’s id and modify the string
5. Declare SensorManager and TextView.
6. In onCreate method, put initial value for sensorManager  
7. Make some changes at onSensorChanged method
8. The result shows sensor value for x,y and z axis.