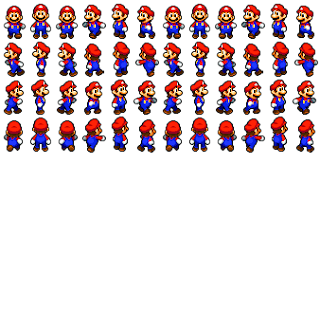
2. Download any sprites. This tutorial will use this sprite. Right click and save it.
3. Create a new project, and you will see the solution explorer as shown.
4. Copy and paste the sprite in content folder. (usually in myDocument>> Visual Studio 2010>>Projects>>(project name) >> (project name) >> (project name)Content.
5. Edit the code (Game1.cs)
-public class Game1 : Microsoft.Xna.Framework.Game
{
GraphicsDeviceManager graphics;
SpriteBatch spriteBatch;
Texture2D character;
Vector2
position = new Vector2(200, 200);
Point frameSize = new Point(28, 41);
Point currentFrame = new Point(1, 0);
Point sheetSize = new Point(12, 8);
public
Game1()
6. Code Explaination
Texture2D character;
// Texture2D to keep the image of our character
Vector2 position = new Vector2(200, 200);
//hold the position of our character on the screen
Point frameSize = new Point(28, 41);
//each character size will be x= 336/12 =28
y= 324 / 8 = 40.5 = 41 (assuming white space also filled
with mario character)
Point currentFrame = new Point(1, 0);
// hold which position we are. In case (1,0),
screen will show this
image.
Point sheetSize = new Point(12, 8);
7. Load image
-Right click on the content folder>>Add existing item>> choose mario sprite.
8. Load image (code)
protected override void LoadContent()
{
// Create
a new SpriteBatch, which can be used
to draw textures.
spriteBatch =
new SpriteBatch(GraphicsDevice);
character = Content.Load<Texture2D>("mario8d");
}
Note: put in the bracket (“”) the sprite image’s name. In this case, the sprite is mario8d.png
9. Draw the sprite
protected override void Draw(GameTime gameTime)
{
GraphicsDevice.Clear(Color.CornflowerBlue);
spriteBatch.Begin();
spriteBatch.Draw(character, position,
new Rectangle(
frameSize.X * currentFrame.X,
frameSize.Y * currentFrame.Y,
frameSize.X,
frameSize.Y),
Color.White, 0, Vector2.Zero, 1,
SpriteEffects.None, 0);
spriteBatch.End();
base.Draw(gameTime);
}
10. Run the code
-Build (Shift+F6) and Run (Ctrl+ F5).The static (1,0) mario will appeared.


No comments:
Post a Comment